With split-cell (aka half-cell) modules becoming more prominent in the market, it is important to understand their inherent differences and have the know-how necessary to install them.
Split-cell modules have allowed manufacturers to invent a more energy dense module without sacrificing output or quality. While these modules are traditionally more expensive, their enhanced efficiencies and electrical characteristics make them attractive to installers and array owners alike. This article aims to provide you with an understanding of their electrical differences and the best installation practices for the products. For a deeper understanding on their physical differences, I recommend reading this article.
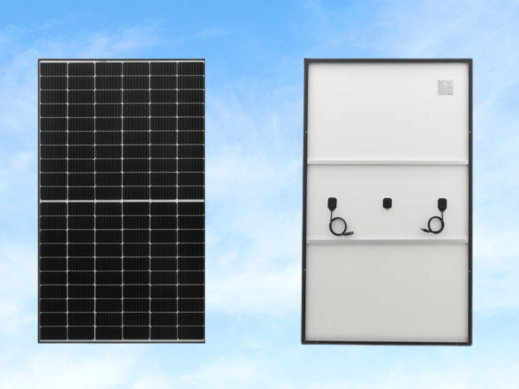
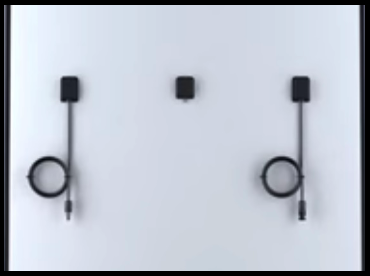
Split-cell modules are manufactured by cutting the silicon wafers in half and wiring each side of the module separately. As depicted in the picture below, this wiring method produces two leads - one on either side of the module. This is unlike a traditional junction box where both leads come out of a single location. As a result, this has presented new challenges and opportunities for installers.
Wire Management:
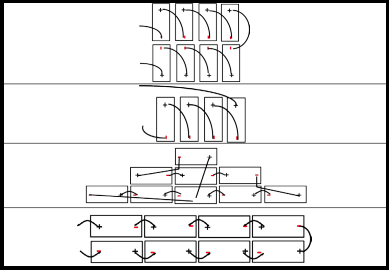
A primary challenge created by these products is the differences in wire management techniques. Whether you are wiring these in series or parallel, it will be a different experience than wiring a standard module. This is especially true for flush roof mount racking. Canadian Solar, the manufacturer of the HiDM split-cell modules, has recommended the wiring techniques pictured below. We believe, as long as the split junction boxes fall on the short side of the modules, that these will be efficient ways to wire the modules together. The excess wires created with some of these wiring methods can easily be organized using the standard wire clip.
MLPE Additions:
With the advent of microinverters, NEC-17 and RSD, many solar installations are now equipped with module-level power electronics (MLPEs). The split junction boxes of these modules do not allow installers to commission this equipment as they would a traditional module. Having worked closely with installers that have been faced with this issue, we recommend the following:
-
Landscape: center the MLPE to the long side of the module.
-
Portrait: center the MLPE to the short side of the module. Wire an extension on to the far-most lead up to the MLPEs. Proceed to wire the MLPEs along the rail.
Racking Techniques:
While most module manufacturers require certain racking schemes to meet warranty commitments, there are some racking configurations that work best. When racking these modules on a flush roof racking configuration, it is often easier - for wiring purposes - to keep the modules in landscape orientation. Conversely, installers have expressed that it is easier to install these modules in portrait orientation when using a ground mount. While it might sound elementary, please ensure that you are leading the positives to the negatives. It is obvious, but some installers tend to think that you can install the module regardless of orientation due to the split junction boxes.
Split-cell modules have already had a profound impact on the solar market and will continue to influence how installers and manufacturers approach new products. It is important to know and understand the benefits and constraints before getting involved with these products. For more information on the split-cell modules, their impact on the solar market, and opportunities to integrate them into future projects, please connect with one of our Account Managers.